Looking for help?
< All Topics

Pitch Avatar integration with Zapier

Possibilities Zapier integrations 

Zapier allows you to create Zaps – bundles for automatic data transfer between different services.

Pitch Avatar integration with Zapier will allow you to:

  • Set up the transfer of data about the listener who filled out the lead form inside your presentation to any CRM, email or any other service;
 
  • Attach a link to the listener activity report to their card in CRM;
 
  • Receive notification by Email, Slack channel, Viber or Telegram every time the listener enters the presentation, when the listener calls the presenter or when the presenter entered the presentation;
 
  • Create personal links to show a presentation according to predefined settings and send this link to CRM or as a variable to any other service with which the application was created.
 

Pitch Avatar and Zapier enable seamless delivery of your content, whether you’re presenting it to a single client or a large audience.

What apps can Zapier integrate with?

Zapier provides a wide range of integration options to improve the productivity and efficiency of your workflow, whether you need to automate data transfer, simplify data exchange, trigger event-based actions, or synchronise information across multiple platforms.


Zapier can connect to numerous well-known apps, including Gmail, Slack, Trello, Google Sheets, Snov.io, Sendpulse, Shopify, Asana, Dropbox, Mailchimp and more – over 5,000 apps.

Supported triggers and actions Pitch Avatar

A trigger is an event that starts a Zap (binding), and an action is an event that will be executed as a result.

Pitch Avatar Triggers:

  • New listeners filled out the lead form 

Triggered when a new listener fills out the lead form in presentation. The listener data is transferred to any CRM with which the app was created.

  • Finished presentation report 

Triggered when a finished presentation report is generated. A link to the report is sent to any CRM, Slack channel or other service with which this app was created.

  • Get joined new listener

Triggered when the user has joined the presentation. You can send a message with a predefined text to the messenger, Slack channel or e-mail. It all depends on the selected service with which the app was created.

  • Call Presenter

Triggered when the “Call the Presenter” button is pressed. Similarly, it can send a message with a predetermined text to a messenger, a Slack channel or an e-mail. It all depends on the selected service with which the app was created.

  • Get joined Presenter 

Triggered when the presenter has joined the presentation. Similarly, it can send a message with a predetermined text to a messenger, a Slack channel or an e-mail. It all depends on the selected service with which the app was created.

Pitch Avatar actions:

  • Create presentation link

Creates a link to a presentation according to the given settings and sends this link to CRM or as a variable to any other service with which the app was created.

What is a Zap template?

Zap templates are automatically performed actions that follow the if-then rules. Each Zap consists of one trigger (“if this happens”) and one action (“then the following is done”), which are executed by connecting two applications: the launching application (the application from which the data for the Zaps is sent) and the executing application (application to which Zap data is sent).

To use Zapier, you will need:

  • Connect two supported apps using Zapier (Pitch Avatar and another Zapier-supported app).
 
  • Set up rules for each Zap you create.
 

Button VIEW INTEGRATION OPTIONS

Where to begin?

Important: before starting, ensure you have created a free account on Pitch Avatar.

  1. Register/Login to your account at zapier.com.

2. Click on one of the buttons Try this Zap or browse the list of available Zapier integrations to find the app you want to connect to the Pitch Avatar.

Available Pitch Avatar Zap Templates:

Zapier Elements can be used with HTML since they are custom elements (web components). Add the Head snippet to the <head> and use the Body snippet to add a <zapier-zap-templates> to your page.

Head

<script type=”module” src=”https://cdn.zapier.com/packages/partner-sdk/v0/zapier-elements/zapier-elements.esm.js“></script>
<link rel=”stylesheet” href=”https://cdn.zapier.com/packages/partner-sdk/v0/zapier-elements/zapier-elements.css“/>

Body

<zapier-zap-templates
theme=”auto”
apps=”roi4presenter”
create-without-template=”show”
limit=”10″
link-target=”new-tab”
presentation=”row”
use-this-zap=”show”
></zapier-zap-templates>

If you can’t find the app or template you’re looking for, the reasons are as follows:

  • The app you requested is not connected to Zapier;
 
  • There is no ready-made template for this Zap.

In such a case, you must go to the Zapier page and create a Zap there.

In addition, you can ask us to create a Zap template for you and other users to use in the future.

Attention: we are constantly adding new Zap templates based on user requests. If you want to help us and suggest your favorite applications and integration scenarios, we invite you to contact us at email support@pitchavatar.com.

3. In block 1. Trigger log in to Pitch Avatar. To do this, click the button Choose.

In the open window, enter your login and password to enter CMS Pitch Avatar and click Yes, Continue to Pitch Avatar

Then click Continue.

4. Click the Test trigger. If the test is successful, the Warning icon will change to a green checkmark. Then press Continue again.  

5. In block 2. Action in the field Account authorises your Gmail account and click Continue.

6. In the field Action, fill in the required data and click Continue:


  • To – Specify one or more recipients of the letter.
  • Cc – Specify one or more recipients of the copy of the letter.
  • Bcc – Specify one or more recipients of the BCC message.
  • From – Select an email address or alias from your Gmail account. The default is the primary email address.
  • From Name – Enter the sender’s name.
  • Reply To – Specify a single reply address other than your own.
  • Subject (required) – Add a header to the email.
  • Body Type – Specify the message type. We recommend leaving this option unchanged.
  • Body (required) – add a message template.
  • Signature – set up a signature for the letter.
  • Label/Mailbox – select a label or category where the letter will be delivered.
  • Attachments – add the file to be attached. Can be an actual file or a public URL to be downloaded and attached.

Sample letter template:

7. In the field Test, click Test action. After that, a test email will be sent to your specified email address.

Now you can enable Zap – click Publish:

Your Zap is ready. Every time a listener fills out a lead form from any of your presentations configured in Pitch Avatar, you will receive a notification letter about this event in your Gmail mail.

The letter contains the template’s text you specified in the settings in Zap.

Create your first Zap from scratch (example)

Didn’t find a suitable Zap template? Create custom automation by first choosing a trigger to run it.


For example, let’s describe the creation of a Zap that sends a Gmail notification email if a listener fills out a lead form inside a presentation:

  1. In the Zapier interface, click on the button Create Zap:

2. In the block 1 Trigger, find in the search bar Pitch Avatar:

3. In the field, Trigger Event, select the event on which the Zap will be triggered – New Listener Filled Out the Lead Form. Then click Continue:

4. Log in to Pitch Avatar. To do this, click the button Choose

In the open window, enter your login and password to enter CMS Pitch Avatar and click Yes, Continue to Pitch Avatar

Then click Continue.

5. Select New Listener Filled Out the Lead Form in the field Trigger, and press Continue again.

6. Click the Test trigger. If the test is successful, the Warning icon will change to a green checkmark. Then press Continue again. 

7. In block 2. Action find and connect Gmail.


8. In the field Action Event, select the action to take – Send Email. Then click Continue:

9. In the field Account, authorize your Gmail account and click Continue.

10. In the field Action, fill in the required data and click Continue:


  • To – Specify one or more recipients of the letter.
  • Cc – Specify one or more recipients of the copy of the letter.
  • Bcc – Specify one or more recipients of the BCC message.
  • From – Select an email address or alias from your Gmail account. The default is the primary email address.
  • From Name – Enter the sender’s name.
  • Reply To – Specify a single reply address other than your own.
  • Subject (required) – Add a header to the email.
  • Body Type – Specify the message type. We recommend leaving this option unchanged.
  • Body (required) – add a message template.
  • Signature – set up a signature for the letter.
  • Label/Mailbox – select a label or category where the letter will be delivered.
  • Attachments – add the file to be attached. It can be an actual file or a public URL to be downloaded and attached.


Sample letter template:

11. In the field Test, click Test action. After that, a test email will be sent to your specified email address.

Now you can enable Zap – click Publish:

12. Give your Zap a descriptive name, such as a Lead form notification for Gmail.

Your Zap is ready. Every time a listener fills out a lead form from any of your presentations configured in Pitch Avatar, you will receive a notification letter about this event in your Gmail mail.

The letter contains the template text you specified in the settings in Zap.

Dashboard Zapier

If you have created more than one Zap, use the dashboard to manage them, where you can do the following:


  • Turn Zaps on or off
  • Removing a Zap
  • Creating New Zaps
  • Saving Draft Zaps Before Activating Them
  • Controlling Account Usage

Technical support

Popular questions about Pitch Avatar and Zapier integration are collected in leadership.

If you have any problems with the Zapier service, please contact service support Online.

Tariffs

Free Zapier Plan has limitations: you cannot create more than 5 Zaps, each containing a Trigger and one Action. The number of operations Zaps performs does not exceed 100 units per month.


Paid tariff opens up more opportunities for automation. For example, you can add up to 20 Actions per Zap. The number of operations performed by Zaps is 750 per month.

Learn more about Zapier plans.

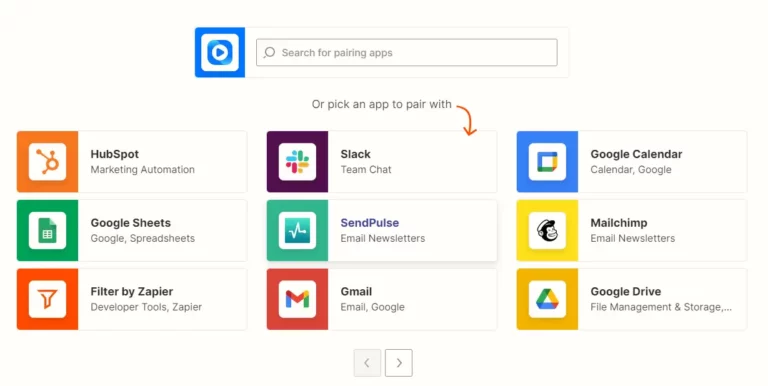
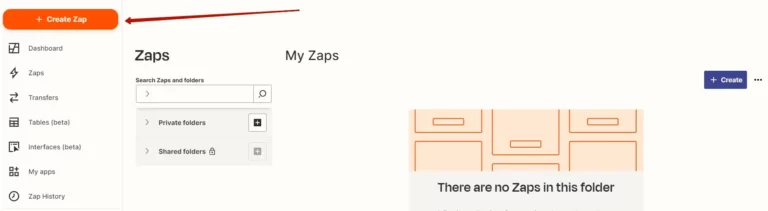
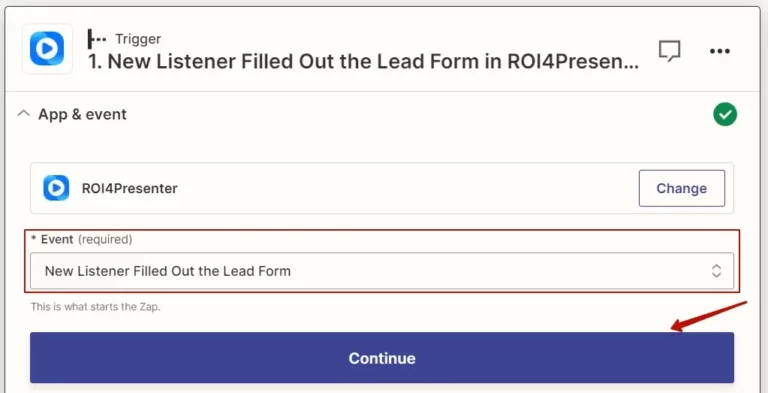
And what Zap is on your top list?

Before you start creating automated Zaps, we would like to ask you for a favor.

Email us via chat or support@pitchavatar.com for which applications (and use cases) you want to see Zap templates. What has helped you and your business the most? Help us make our service better 🙂.

Table of Contents